Easy No-Bake Cheesecake
Easy Bakes, Kids Bakes

Easy No-Bake Cheesecake with Rice Krispies Treats Crumbles

Easy No-Bake Cheesecake

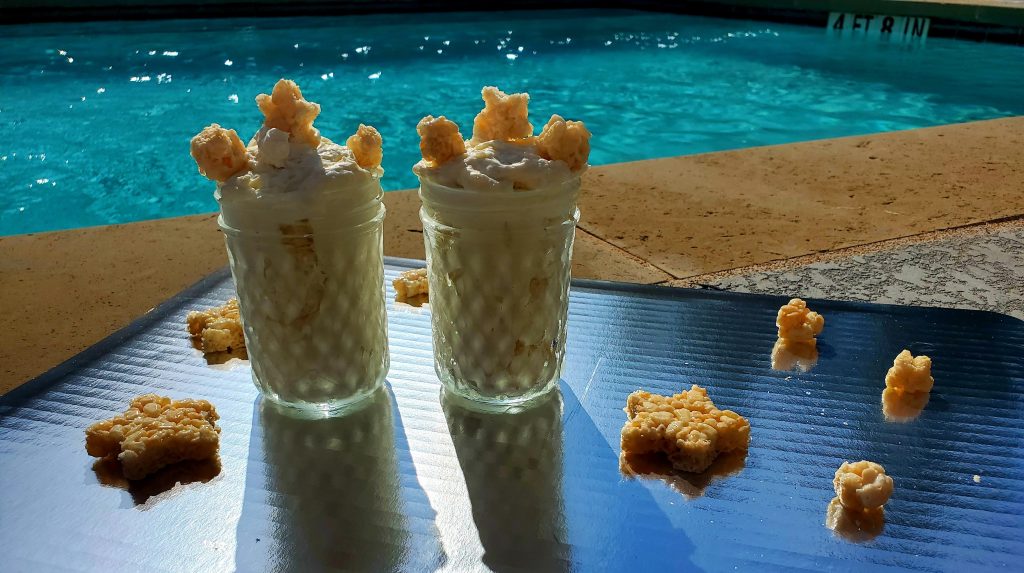
One of my all-time favorite summer treats is cheesecake! Especially a cool, creamy and easy no-bake cheesecake with Rice Krispies Treats Crumbles! I first made this recipe as a full cheesecake with a Rice Krispies crust but decided to make it kid friendly by filling mason jars with the cheesecake and using the Rice Krispies Treats crumbles for some added crunch. Below is my recipe for an easy no-bake cheesecake your family and friends will love!

Cheesecake Ingredients 

  1. 2 cups of cold heavy whipping cream
  2. 3 (8- ounce) packages cream cheese, room temperature
  3. 1 cup of powdered sugar
  4. 1 tablespoon of vanilla extract

Rice Krispies Treats Crumbles Ingredients 

  1. 3 cups of Rice Krispies cereal
  2. 2 cups of mini marshmallows
  3. 2 tablespoons of butter

Directions for Rice Krispies Treats Crumbles

  1. In large saucepan melt butter over low heat. 
  2. Add marshmallows and stir until completely melted. 
  3. Remove from heat.
  4. Add KELLOGG’S RICE KRISPIES cereal. Stir until well coated.
  5. Line a baking sheet with parchment paper and pour Rice Krispies mixture onto baking sheet.
  6. Add another sheet of parchment paper on top and roll with a roll pin until your Rice Krispies are flat.
  7. Pull or cut small pieces of the Rice Krispies and roll into small balls. (You can also use cookie cutters to shape them into fun shapes for the toppings)
  8. Put to the side

Directions for the Cheesecake

  1. In the bowl of your stand mixer fitted with the whisk attachment, beat the heavy cream on medium-high speed until stiff peaks form. Remove the whipped cream from the mixing bowl and set aside.
  2. In the same mixing bowl, replace the whisk attachment with the paddle attachment. Mix the cream cheese, powdered sugar, and vanilla extract together on medium speed for 2 minutes, or until smooth and creamy, scraping the sides of the bowl as needed.
  3. Remove the bowl from the mixer and using a rubber spatula, fold in the whipped cream evenly, making sure to scrape the sides and bottom of the bowl completely.
  4. Add cheesecake to 8 small 8 oz mason jars
  5. Cover and chill for 4 hours or overnight.
  6. Remove from refrigerator and top with Rice Krispies Treats crumbles
No-Bake Cheesecake
Easy No-Bake Cheesecake with Rice Krispies Treats Crumbles

Tips, Tricks, and Don’ts That I did

  1. Put your bowl and whisk attachment into the freezer for 30+ minutes before making your whipped cream. This little trick helps make the creamiest whipped cream you’ll ever eat.
  2. Another tip to ensure the creamiest whipped cream, make sure your heavy cream is very cold.
  3. Take the cream cheese out of the refrigerator a few hours before you’re ready to start your cheesecake. It needs to be room temperature for this cheesecake to work.
  4. Don’t forget to be very gentle when folding the whipped cream into the whipped cream cheese. This will ensure the cheesecake keeps its light fluffy texture.
  5. You can make recipe as a full cheesecake instead of the smaller portions. Just double the recipe for the Rice Krispies and use a 9-inch round pan for the crust. Pack the bottom of the pan with the Rice Krispies and top with the cheesecake mixture, cover and chill overnight.
  6. If you’re unsure where to buy mason jars; Target has a ton of options! I picked these super cute ones up last week. https://www.target.com/p/ball-8oz-4pk-aqua-vintage-regular-mouth-jars/-/A-54314698#lnk=sametab
  7. If you like this recipe, check out these easy brown sugar chocolate chip cookies that are sure to WOW your friends and family just in time for 4th of July! https://eats8.food.blog/easy-brown-sugar-chocolate-chip-cookies/
  8. As always, don’t forget to Enjoy!
Easy No-Bake Cheesecake
No-Bake Cheesecake
Kids Bakes

Easy Oreo Dirt Cake with Gummy Worms

Dirt Cake

Summer! Finally! I know I’m not the only one who feels like this school year has lasted a bazillion years… I had one kid at school in person (the youngest) and one kid who did the entire year virtually (the oldest, 12 going on 50). I asked my 12-year-old how he felt on the last day of school and he said “tired” (I’m with ya kid!) It’s been a long year for everyone, so I decided to throw a quick party for the neighborhood kids to celebrate the end of the school year and kick off the summer.

I headed to Target to grab some party supplies and found some super cute treat cups. Next, I spotted gluten-free Oreos and knew what I had to make. DIRT CAKE! My kids LOVE my homemade whipped cream, so dirt cake was the PERFECT treat to whip together. Below you’ll find my recipe for a summer party favorite along with my Tips, Tricks, and Don’ts that I did! Enjoy!

Ingredients

  1. 2 boxes of chocolate pudding
  2. 1 package of (family size) Oreos
  3. 1 bag of Gummy Worms
  4. Homemade Whipped Cream
  5. 12 individual Treat Cups, Bowls or Tupperware

Ingredients for Whipped Cream

  1. 2 cups of heavy cream
  2. 2 teaspoons of powdered sugar
  3. 2 tablespoons of vanilla

Directions for Pudding and Oreos

  1. Make the pudding according to the directions on the box. Let it chill for at least 1 hour.
  2. Smash the heck out of the Oreos. Add several Oreos to a freezer bag and pound with a hammer or meat tenderizer until crumbled.

Directions for Whipped Cream

  1. Add the heavy cream and vanilla into cold bowl.
  2. Beat for 2 minutes until thick.
  3. Add the powdered sugar.
  4. Beat until fluffy peaks form (about 5 minutes).

Putting It All Together

  1. Cover the bottom of the treat cup with the crushed Oreos (about 2 crushed cookies).
  2. Add 1/4 cup of pudding.
  3. Dollop 2 tablespoons of whipped cream.
  4. Sprinkle with more Oreos.
  5. Add 4 gummy worms (more or less depending on how much you like gummy worms).
  6. Repeat steps 1-5 for the remaining 11 cups.

Tips, Tricks, and Don’ts That I Did

  1. Freeze the bowl and beaters you’re using to make the whipped cream for at least an hour. It’s a little thing that makes a BIG difference. You’ll end up with a much fluffier cream using the cold bowl and beaters.
  2. Double up your freezer bags when crushing the Oreos. My freezer bag tore and I ended up with cookies all over the place. Doubling the bags will help catch wild Oreos if the first bag tears.
  3. Let the kids help! This is a fun activity everyone will have enjoy making!
  4. Refrigerate the finished treats for at least 30 minutes before eating.
  5. As always, don’t forget to ENJOY!

Kids Bakes

Giant Ginger Cookies

Easy Giant Ginger Cookies

Christmas Cookie Season is in full swing and I have given in to baking all things round and delicious. Last weekend I decided to challenge myself and bake 12 different kinds of cookies. Baking 12 different kinds of cookies sounded like a great idea… until… I actually started baking. I spent a full Saturday in the kitchen and only baked 6 types. I do not consider the challenge a failure because the 6 kinds of cookies I did manage to bake turned out wonderful.

This week’s bake is the best of the cookie bunch and my favorite type of cookie; Ginger. I love ginger and I wanted to make sure this cookie had that sharp distinctive ginger flavor. Not only are they Ginger-ific, but they are soft too! This cookie ticks all the boxes on my list of cookie criteria. Below is my recipe for the softest and most delicious ginger cookie you’ll ever bake. Don’t forget to keep reading for my tips, tricks, and a few don’ts that I did. I’ll be posting the remaining 5 cookies this week too, so be sure to check back for more cookie recipes!

Ingredients

  • 2 ¼ cups all-purpose flour 
  • 3 teaspoons ground ginger 
  • 1 teaspoon baking soda 
  • 1 teaspoon ground cinnamon 
  • 1/2 teaspoon ground cloves  
  • 1/4 teaspoon salt 
  • 3/4 cup margarine softened  
  • 1 cup white sugar 
  • 1 egg
  • 1 tablespoon water
  • 1/2 cup molasses
  • 3 tablespoons white sugar

Directions

Preheat oven to 350 degrees.

Sift together the flour, ginger, baking soda, cinnamon, cloves, and salt. Set aside.

In a large bowl, cream together the margarine and 1 cup sugar until light and fluffy.

Beat in the egg, then stir in the water and molasses.

Gradually stir the sifted ingredients into the molasses mixture.

Shape dough into walnut-sized balls, and roll them in the remaining 3 tablespoons of sugar.

Place the cookies 2 inches apart onto an ungreased cookie sheet, and flatten slightly.

Bake for 10 minutes in the preheated oven.

Allow cookies to cool on baking sheet for 5 minutes before removing to a wire rack to cool completely.

Santa’s Favorite Ginger Cookie

Tips, Tricks, and a few Don’ts that I did

Don’t be afraid of ginger or molasses. I thought working with those ingredients was something out of my league, but honestly, these cookies are easier than plain ole chocolate chip.

Use a cookie scoop, but then roll them in between your hands to get them a perfectly round shape. I smooshed mine down just a little bit after rolling.

Don’t refrigerate the dough before baking. Unlike most cookies, these can go straight into the oven after you’ve placed them on the baking sheet.

Do save some for Santa! He’s sure to leave you lots of surprises after eating these delicious treats.

As always, don’t forget to ENJOY!

Giant Ginger Cookies
Cookies, Kids Bakes

Oreo Fudge Brownie Cookies

Holiday Cookie season is here! It’s a little earlier than usual, but it’s 2020 and we could all use a little joy, even if it’s 6 weeks early. My inspiration for this week’s bake comes from a few leftover goodies from Halloween. Below is the recipe for my Oreo Fudge Brownie Cookies along with my tips, tricks, and don’ts that I did. This is a cookie recipe you’ll want to make all year; they’re that good!

Oreo Fudge Brownie Cookies

Ingredients for Cookies

  • 1 stick unsalted butter
  • 1 package (12oz) of semi-sweet chocolate chips
  • 4 eggs
  • 1 cup of sugar
  • 2 teaspoons of vanilla extract
  • 1 cup Gluten-Free Flour
  • 1/2 cup of unsweetened cocoa powder
  • 1/2 teaspoon salt
  • 1/2 teaspoon baking powder
  • 1 package (12oz) of white chocolate chips
  • 1.5 cups of crushed oreo wafers
  • 1/4 cup powdered sugar (for topping the cookies)

Directions for Cookies

Heat oven to 350 degrees.

In a microwave-safe bowl, combine semi-sweet chocolate and unsalted butter. Microwave on high for 1.5 minutes or until the mixture is smooth when stirred. Set aside.

Mix eggs, sugar, and vanilla with hand mixer in large bowl until blended.

Add flour, baking powder, salt, and cocoa powder. Mix on low until well combined.

Blend in chocolate mixture.

Fold in 1 cup of the crushed Oreos.

Stir in white chocolate chips.

Drop a tablespoon or cookie scoop of mixture onto parchment-lined cookie sheet.

Bake for 15 minutes or until shiny.

Cool on cookie sheet for 2 minutes.

Move to cooling rack and top with remaining Oreos and powdered sugar.

Yuuum!!!

Tips, Tricks, and Don’ts that I did

Be careful not to overcook your chocolate chips in the microwave. The texture should be smooth, not grainy. If it’s grainy, you’ve heated them for too long and will need to redo it.

Oreos are not gluten-free. To limit the amount of gluten in my batch of cookies I used gluten-free flour. You can use regular flour if you’d prefer.

This cookie recipe would be great with nuts too. Feel free to play with the ingredients and add any extras you like.

These cookies should be fudgy, not dry. If they look underbaked, don’t worry! As long as you’ve baked them for the time listed in the instructions they’re done.

These cookies are delicious reheated too. Microwave for 5 seconds and add a dollop of vanilla ice cream or whipped cream on top.

As always, don’t forget to ENJOY!

Merry Christmas!
Kids Bakes

Easy Brown Sugar Chocolate Chip Cookies

Easy Brown Sugar Chocolate Chip Cookies

This weeks bake was inspired by a fellow baker who told me he sometimes substitutes brown sugar in his bakes instead of using granulated sugar. Since I’m not an experienced baker, I thought I’d try this tip on something a little bit easy; chocolate chip cookies. The cookies turned out great and I found the brown sugar adds an unexpected delicious fullness to the flavor. Below is the recipe along with my tips and tricks and don’ts that I did.

Ingredients

2 and 1/4 cups all purpose flour

1 teaspoon baking soda

1 teaspoon salt

2 sticks softened butter

2 and 1/2 cups packed brown sugar

1 teaspoon vanilla extract

2 large eggs

2 cups dark chocolate morsels

Directions

Preheat oven to 375 degrees.

In a small bowl combine flour, baking soda and salt.

In large bowl beat butter, vanilla, and brown sugar until creamy.

Add eggs one at a time until well mixed.

Slowly add in flour mixture until well mixed.

Stir in morsels until evenly distributed.

Scoop with cookie scoop onto parchment lined baking sheet.

Bake for 10 minutes or until golden brown.

Cool on baking sheet for 2 minutes.

Move to cooling rack and cool completely.

Tips and Tricks and Don’ts that I did

Parchment paper is your baking best friend. Instead of flooding your cookie sheets with cooking spray, line them with parchment paper and the cookies slide right off.

I’ve recommended this before, but a cookie scoop is a game changer. You’ll get a consistent sized cookie with every scoop.

This dough can be frozen and used later. I made enough to share and froze the remaining dough to use later this week for after school treats for my boys.

Don’t be nervous about the brown sugar substitution. I thought for sure my cookies wouldn’t turn out, but these cookies are some of the best chocolate chip cookies my taste testers have ever had. It was worth the risk and an amazing tip I’ll continue to use. Enjoy!

Brown Sugar Chocolate Chip Cookies
Cookies, Kids Bakes

Teacher Treats and Easy Chocolate Chip Cookies

WOW! I say this every year, but December has flown by. It’s already time for the kids to be out for Christmas break, which means…. Teacher Gifts! I always like to do something a little personal for my kids teachers because they do so much for us. This year I decided to give a few of our Austin favorites as gifts like Cuppa Austin Coffee and Austin Gourmet Popcorn as well as some very easy, but very tasty made from scratch chocolate chip cookies.

This recipe is very easy to follow and makes enough cookies for my kids seven teachers with extras to spare for the little hands that helped with the baking. Below is the recipe with a few tips and tricks at the end.

Ingredients

1 cup softened butter

1 cup white sugar

1 cup packed brown sugar

2 eggs

1 teaspoon baking soda

2 teaspoons hot water

1/2 teaspoon salt

3 cups flour

2 cups semisweet chocolate chips

Directions

Preheat oven to 350 degrees.

Mix together butter, white sugar and brown sugar on medium speed until smooth.

Beat in eggs one at a time, then add vanilla.

Dissolve baking soda in hot water, add to batter with salt.

Mix in flour 1 cup at a time until well mixed.

Add chocolate chips.

Use scoop to place cookies on an ungreased cookie sheet.

Bake for 10 minutes or until the edges are a light golden brown.

Remove cookies from pan and place on cooling rack.

When cooled, we packed our cookies into Christmas treat bags to give to our teachers along with the other goodies.

Tips and Tricks and Don’ts that I did

Don’t over bake your cookies. It’s really easy to do. Remember cookies continue to cook when you take them out of the oven. As long as your edges are lightly golden you will have a perfect cookie.

Freeze any extra cookie dough you have. If you only want to make 20 cookies, portion the remaining cookie dough into plastic bags, throw it in your freezer and use when you like. To bake the frozen cookie dough set oven to 350 degrees and bake for 20 minutes. The cookies will bake just like you made them the first time. We’re using our leftover cookie dough for Santa cookies next week!

Invest in a cookie (ice cream) scoop. This is a GAME CHANGER. You’ll get a perfect cookie every time. Below is the scoop I bought from Amazon. We make cookies all the time and I can’t imagine not having my scoop.  https://www.amazon.com/Disher-Scoop-Cream-Portion-Control/dp/B06XY9RDSQ/

These cookies are really easy, but also really fun. They might be the only bake I’ve done that have kept my kids attention the entire time. They loved helping me and being able to say to their teachers “Hey, I helped bake that!”

I’ll end with this. Val, a contestant, from The Great British Baking Show once said “When you bake, you always bake for a reason. You’re giving it to people, so you make it the best you can. You make it with love. And whenever I make anything, I stir love into it. I knead love into it, so when I present it, its special.”

I love this so much because it’s so true. In the short time I’ve been baking I’ve learned that baking is so much more than ingredients and oven temperatures. Bakers put something special into each bake. We LOVE our teachers and it makes me so happy to bake something out of love with my kids for them even if it’s something small but tasty like Chocolate Chip Cookies.

I’m looking forward to sharing many more bakes next year, the good ones and bad ones and especially the scrummy ones! Merry Christmas and Happy New Year from Mae Bakes!!

Kids Bakes

Fudge Brownies

When the temperature dips below 65 degrees in Texas it’s basically 30 below zero and when it’s that cold it’s hard to come up with indoor after school activities for the kids. For my next bake I decided to attempt the perfect brownie with the kids help to keep them occupied for at least a few minutes. Below is the recipe with my don’ts that I did and a few tips I picked up along the way.

Ingredients For Brownies

1/2 cup of butter melted

2 eggs

1 teaspoon of vanilla extract

1 cup white sugar

1/3 cup unsweetened cocoa powder

1/4 teaspoon salt

1/2 cup flour

1/4 teaspoon baking powder

1/4 cup semi sweet chocolate chips

Ingredients for Chocolate Whipped Cream

3 tablespoons of melted butter

1/2 cup of unsweetened cocoa powder

1 teaspoon vanilla

2 cups powdered sugar

1/2 cup heavy cream

Directions for Brownies

Preheat Oven to 350 degrees and grease a 9 inch brownie pan

In medium bowl beat eggs on low setting until eggs are light yellow (about 5 minutes)

Add melted butter, sugar and vanilla. Continue to mix until well combined

Add cocoa, flour, salt and baking powder. Mix until combined (about 2 minutes)

Spread into prepared pan

Sprinkle with chocolate chips

Bake for 25 minutes (or until toothpick comes out clean)

Directions for Chocolate Whipped Cream

Blend all ingredients with mixer on medium setting until mixture has a mousse like consistency

Top warm brownie with whipped cream

Don’ts that I did and a few tips and tricks

  • Don’t be afraid to beat your eggs. The perfect brownie starts with eggs that have been well beaten.
  • If you’re an edge person or a middle gooey person these brownies have something for everyone. Don’t over bake your brownies to get that perfect edge. It will happen if you follow the instructions. Trust me, there’s nothing worse than a hard overcooked brownie.
  • The brownies are amazing with or without the whipped cream. I preferred them without, but the kids liked them with. Feel free to skip that step and maybe add a little vanilla ice cream instead. YUM!
  • Cut the brownies when they are warm, but don’t be discouraged if your cuts aren’t perfect. Brownies are surprisingly hard to cut. It helps to wipe your knife in between each cut, but isn’t necessary.
  • Store brownies in tupperware and heat them up for about 10 seconds in the microwave if you enjoy them later. They are also delicious at room temperature.
  • ENJOY!
Kids Bakes

Quick and Easy Fried Doughnuts!

For my next bake I decided to make my kids most favorite breakfast dessert… DOUGHNUTS!

My first thought when I decided to make doughnuts was to make easy baked cake doughnuts. There are TONS of recipes out there and they all seem pretty simple, but I decided if I was going to learn how to make doughnuts I would do it the conventional (fried) way. That makes this technically not a bake, but a fried.

The scariest part of this recipe was not the frying, it was the yeast and the proving. I’ve watched too many baking shows to know that proving can go really wrong really fast. The directions on the yeast packet even gave me a little anxiety. I felt completely out of my element, but I powered through and quickly figured out that making these doughnuts was not as hard as I thought it would be. Below is the recipe for Glazed Doughnuts and Chocolate Covered Doughnuts along with Powered Sugared Doughnut Holes. I’ve also included a few tips and tricks and my don’ts that I did.

The Ingredients for Doughnuts

1 cup whole milk

1/4 cup + 1 teaspoon of sugar

1 packet of active dry yeast

4 cups of flour

1/2 teaspoon kosher salt

6 teaspoons of melted butter

2 large eggs

1/2 teaspoon vanilla extract

Vegetable oil for Frying

Glaze

1/4 cup whole milk

2 cups powdered sugar

1/2 teaspoon vanilla extract

Chocolate Frosting

2 cups semi sweet chocolate chips

1 cup heavy cream

Sprinkles (optional)

Directions

Grease a large bowl with cooking spray and set aside.

In a small microwavable bowl add 1 cup of milk and heat until warm (about 40 seconds). Add a teaspoon of sugar and stir until dissolved. Sprinkle yeast over the sugar milk mixture until frothy (about 10 minutes).

In a medium bowl whisk together flour and salt.

In a large bowl whisk together remaining sugar, butter, eggs and vanilla. Pour in yeast mixture. Stir until well combined. Next add the rest of the dry ingredients stirring with mixing spoon until a shaggy dough forms. Transfer dough to a lightly floured surface and knead until elastic (about 5 minutes).

Form into a tight ball then place in oiled bowl and cover with a clean dish towel. Let dough rise in a warm spot in the kitchen until it doubles in size (about an hour).

Line large baking sheet with parchment paper. Punch down dough then transfer to a slightly floured baking surface and roll into a 1/2 inch thick rectangle. Using a doughnut cutter to punch out doughnuts and doughnut holes. Re knead scraps and punch out more doughnuts and doughnut holes. Place onto baking sheet and let rise for another forty minutes.

Glaze

Whisk glaze ingredients until well combined.

Chocolate Frosting

Pour chocolate chips into bowl. Heat cream over medium heat for about 2 minutes until very warm. Pour cream over chocolate and let sit for about 1 minute. Whisk chocolate and cream together.

Frying the Doughnuts

Line large baking sheet with paper towels. In a large dutch oven heat 2 inches of vegetable oil to 350 degrees over medium heat. Cook doughnuts in batches until golden brown (about 1 minute on each side). Transfer doughnuts to paper towels to drain and cool slightly. Add doughnut holes to oil moving turning frequently to ensure each part of the doughnut hole is fried. Transfer to paper towels for draining.

Glazed Doughnuts

Dip doughnuts into glaze while still warm and place on cooling rack.

Chocolate Frosted Doughnuts

Dip doughnuts into frosting and add sprinkles (optional).

Doughnut Holes

Place doughnut holes into a bowl with a lid, add 1/2 cup of powered sugar and shake.

Tips, Tricks and a few Don’ts that I did

1. Invest $10 in a doughnut cutter. It’ll save you time and a headache. I’ve included the link to the one I purchased from Amazon below. https://www.amazon.com/gp/product/B07NK3GK2R/ref=ppx_yo_dt_b_asin_image_o00_s00?ie=UTF8&psc=1

2. Don’t be afraid of the yeast. The instructions say to let yeast get frothy once it’s added to the milk. I was afraid my yeast wasn’t frothy enough the first round and ended up throwing out my first batch. I think I expected a frothy explosion and when that didn’t happen I assumed I did something wrong. My next batch of yeast did the same as the first and the doughnuts turned out great. The lesson is… Don’t throw out your yeast just because it’s not as frothy as you think it should be.

3. Proving is way more fun and rewarding than I ever thought it would be. This was the part that made me not want to make conventional fried doughnuts. I’ve watched so many shows where bakes have been under proved and over proved that I was almost too afraid to even attempt these. The truth is proving is still scary, but it’s not hard and the feeling you get when your dough has doubled in size is worth the fear. I will add that you should treat your dough like a baby. Check the temperature, carry it gently in its bowl, make sure it’s warm enough and it will do exactly what it’s supposed to do. Once you lift the towel and see the tiny ball of dough has grown into a much larger “ready to be rolled into 24 doughnuts sized dough” you’ll be glad you did.

4. Keep watching the oil temperature. My last few doughnuts cooked much faster than the first few because the oil got too hot. 350 degrees is the perfect temp for these so try and keep at that as best as you can.

5. The doughnuts are best enjoyed warm. If you’re eating them the day after take the time to pop them in the microwave for 10 seconds and they’ll taste just like they did when you first made them. Have Fun and Enjoy!