Banana Cream Pie
Easy Bakes, pies

Easy Banana Cream Pie

Banana Cream Pie
Banana Cream Pie

Do you know how incredibly easy it is to make your own vanilla pudding? I didn’t until a few weeks ago when I decided I had to make a banana cream pie. We were watching a show on Food Network when I got the inspiration to try another bake I knew nothing about. Vanilla pudding is the base for this creamy pie and once you see how easy it is to make, you’ll never buy store bought pudding again!

Below is the recipe for my quick and easy Banana Cream Pie. Keep scrolling for my Tips, Tricks, and Don’ts that I did.

Banana Cream Pie

Single Pie Crust Ingredients

  • 1¾ cups All-purpose Flour
  • ¼ tps Salt
  • ⅓ cup Unsalted Butter (Room Temperature)
  • 1½ tbsp White vinegar
  • 6 tbsp 2% Milk

Pie Filling Ingredients

  • 1¾ cups Whole Milk
  • ½ cup Heavy Cream
  • ½ cup Granulated Sugar
  • ⅛ tsp Salt
  • 4 Large Egg Yolks
  • ¼ cup Cornstarch
  • 2 tbsp Vanilla Extract
  • 2 tbsp Unsalted Butter (Room Temperature)
  • 4 bananas (Sliced)
  • Sprinkle of Ground Cinnamon (Optional)

Whipped Cream Ingredients

  • 1 cup Heavy Cream
  • 3 tbsp Powdered Sugar
  • 1 tbsp Vanilla Extract

Instructions for Crust

  1. In a small bowl combine the flour and salt. 

  2. Cut in butter with fork or dough blender until the mixture is crumbly. 

  3. Sprinkle mixture with vinegar. 

  4. Gradually add milk tossing with a fork until a ball is formed. 

  5. Cover with foil and refrigerate for 30 minutes until easy to handle.

  6. After the pie dough has chilled, preheat oven to 375°F.

  7. On a floured work surface, roll out the chilled dough.

  8. Turn the dough about a quarter turn after every few rolls until you have a circle 12 inches in diameter. 

  9. Carefully place the dough into a 9×2-inch pie dish. 

  10. Tuck it in with your fingers, making sure it is smooth. 

  11. Use a small paring knife to trim excess dough off the edges. 

  12. Chill the prepared pie shell for 30 minutes. You'll want it very cold before blind-baking.

Instructions for Blind-Baking the Crust

  1. Line the chilled pie shell with aluminum foil, making sure to cover the edges so they do not burn

  2. Fill with pie weights or dried rice, then bake until the pie crust is very lightly browned, about 25 minutes.

  3. Remove the foil (and weights) carefully and continue to bake the crust until it is a deeper brown, about 5 minutes more.

  4. Transfer the pie shell to a wire rack to cool completely as you prepare the filling.

Instructions for Pie Filling

  1. Combine the milk, heavy cream, sugar, and salt in a medium saucepan over medium heat. Whisk until all the sugar has dissolved, then bring to a gentle simmer, whisking occasionally. 

  2. Working quickly as the milk mixture begins to simmer, whisk the egg yolks and cornstarch together in a medium heatproof bowl until thick and smooth. 

  3. Very slowly stream in 1 cup (240ml) of the simmering milk to slightly warm the egg yolk mixture.

  4. In a very slow stream, whisk the egg yolk mixture into the pan. 

  5. While continuously whisking, cook until the mixture is thick (pudding consistency) about 1 minute. 

  6. Remove the pan from the heat and whisk in the vanilla extract and butter. 

  7. Place a piece of plastic wrap directly on top of the warm pudding to prevent a film from forming on top. Allow to cool for 15 minutes.

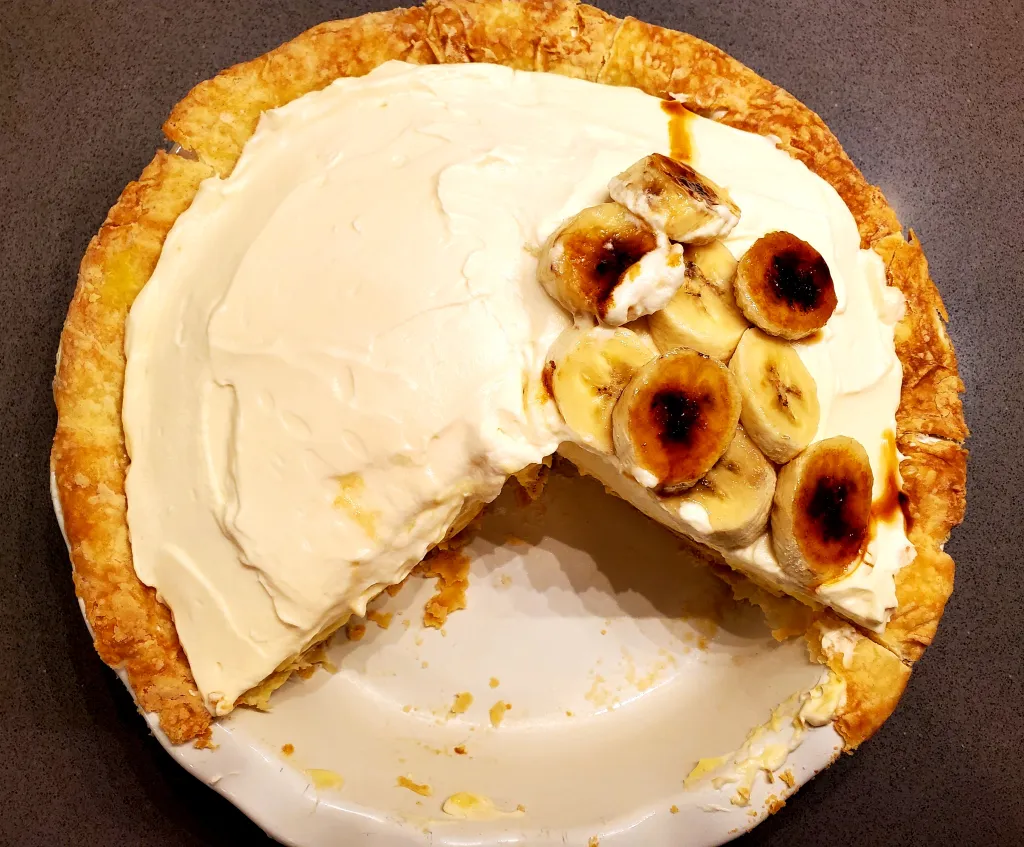
  8. Slice 2 bananas and arrange slices into the cooled pie shell. Sprinkle with cinnamon. Spread cooled filling on top. Place a piece of plastic wrap directly on top of the filling. Again, to prevent a film from forming. Refrigerate for at least 4-8 hours and up to 1 day.

Whipped Cream Instructions (when ready to serve)

  1. Using a hand mixer or a stand mixer fitted with a whisk attachment, beat the heavy cream, powdered sugar, and vanilla on medium-high speed until stiff peaks form, about 5 minutes.

  2. Spread or pipe onto the chilled pie. 

  3. Slice the 2 remaining bananas and decorate the pie with slices. 

  4. Slice and serve.

Dessert
Banana Cream Pie

Banana Cream Pie
Banana Cream Pie

Tips, Tricks and Don’ts That I Did

  • Don’t skimp on the fridge time. This recipe is all about chill, chill, chill, and more chill. Chill the dough and chill the filling. Very cold dough is essential in making a flaky delicious crust. 
  • Don’t let the homemade pudding (the filling) intimidate you. It’s so easy and comes together like magic. All you must do is follow the instructions.
  • Do play with crust and flavor options. This recipe is versatile. You can add vanilla wafers, blueberries, strawberries or even honey. The possibilities are endless.
  • I added a few bruleed bananas to the top of my pie for a little added flavor. You can too, here’s how https://www.youtube.com/watch?v=BI2HlJwAXJw
  • If you liked this recipe, check out my recipe for Easy Macarons here https://eats8.food.blog/easy-macarons/ (Pro Tip- you can use your egg whites from this recipe for your Macarons).
  • As always don’t forget to Enjoy!
Banana Cream Pie


Jacob's Well
Lifestyle

Jacob’s Well

Jacob's Well
Jacob’s Well

My favorite thing about Texas is the outdoor life. People in Texas are always outside… even in the crazy heat. One of the best parts of the outdoor life in Texas is the abundance of swimming holes. These watering holes aren’t your average creeks with warm water and scary snakes either. Texas has some of the most magical places to swim in the world. These spots have the bluest and the coolest waters you’ll ever see and feel. One of my favorites just happens to be a short drive from Austin, Jacob’s Well.

Jacob’s Well is a natural area located in Wimberley, Texas. It sits on 81 acres and was discovered in 1850 when settlers discovered a fountain (it was more of a geyser with very cold water and less of a hole back then) of beautiful clear water. Over the years Jacob’s Well has been explored by divers and scientists who want to know more about this magnificent body of water. The well is full of caverns both large and small. Some caves have yet to be explored because of their small size.

Today Jacob’s Well is visited by people from all over the world. The water stays constant at a cool 68 degrees Fahrenheit which is perfect for those hot summer days in Texas. It’s a beautiful, scenic, and easy hike down to the well (except for a few stairs) complete with wildflowers and bird watching. It also happens to be in one of the sweetest little towns in Texas. Below are my Tips, Tricks and Don’ts that I did to help you plan your trip to this amazing piece of Texas.

Tips, Tricks and Don’ts that I did

  • Make a reservation. We got lucky this year because I forgot I made reservations and ended up making another, so we went twice. The Park itself doesn’t require reservations, but in order to swim you must have a reservation. Reservations open in March, and they go fast so don’t wait!
  • Jump! Part of the Jacob’s Well experience is jumping from the rocks that overlook the well. The first two times we visited we didn’t jump and I kind of feel like we missed out. The third time we went I knew I wanted to try it and I’m so glad we did. For one thing the cold temperature of the water is less of a shock jumping in rather than slowly getting used to it. The second thing… it’s fun! I felt like a kid again. Don’t get crazy or dangerous and try any wild dives but jumping from the lower rocks is a blast. I didn’t know how much fun it could be until I decided to jump…. and jump again! Keep scrolling to see both of my jumps in action!
  • Do explore the entire park. The first couple of times we visited the park we went straight to the well and only the well. Last weekend we decided to get there early and run the trails. It was awesome. We got to see part of the park that I had no idea even existed. The trails are well maintained and easy to run (or walk). It’s a great activity to do before cooling off in the cool waters of Jacob’s Well.
  • Don’t forget your water shoes! Jacob’s Well is a natural water source and has a lot of slippery algae. We watched several people accidentally take the plunge into the frigid waters because they slipped. The rocks in the water can also be painful without the added protection of water shoes.
  • Don’t forget to bring a change of clothes. The visitor’s center is super nice and has changing areas so you can change out of your wet clothes before exploring the town.
  • Speaking of the town… Don’t skip out on exploring the town of Wimberley. It’s a charming little town, has a lot of shopping, and has some of the best restaurants and one of the best bakeries we’ve ever been to. I’ve included links to a few of our favorites here. https://www.sugarshackbakerytx.com http://www.wimberleycafe.com
  • For more information about the history of Jacob’s Well here’s a link to their website. https://hayscountytx.com/departments/hays-county-parks-recreation/jacobs-well-natural-area/
  • If you liked this post, check out my blog about visiting Stubbs in Austin, TX here https://eats8.food.blog/an-intimate-concert-with-2000-strangers/
  • As always, don’t forget to Enjoy!
Jacob's Well
Jacob’s Well

Chocolate Mousse
Easy Bakes

Chocolate Mousse

Easy Chocolate Mousse

I love chocolate. I love chocolate mousse. And of course I love trying new recipes. For this week’s bake I wanted to try something decadent that was also new to me. I’ve never made a real French mousse before and during my baking research decided I needed to try it out. This recipe is creamy and airy. Heavy on the chocolate flavor but light on texture. It’s a refined yet fun dessert that both kids and adults can enjoy. Below is my take on a French mousse that’s easy to make, yet hard to forget. Profiter!

Ingredients for Mousse

  • 3 tablespoons of unsalted butter 
  • 6 ounces of semisweet chocolate, best quality 
  • 3 large eggs, yolks and whites separated 
  • 1/2 teaspoon of cream of tartar 
  • 1/4 cup plus 2 tablespoons of sugar 
  • 1/2 cup of heavy cream, cold
  • 1 teaspoon of vanilla extract

Ingredients for Whipped Cream (for serving)

  • 1/2 cup of heavy cream, cold
  • 1 tablespoon of vanilla extract
  • 2 teaspoons of sugar
  • Chocolate shavings

Directions for Mousse

  • Place the butter in a medium microwave-safe bowl. 
  • Break the chocolate into small pieces directly into the bowl. Microwave it in 20-second intervals, stirring between each bout of heat, until the chocolate is about 75% melted. 
  • Stir, allowing the residual heat in the bowl to melt the chocolate completely. 
  • Let the mixture cool for a few minutes, then whisk in the egg yolks one at a time, mixing until smooth after each addition. Set aside.
  • In the bowl of a stand mixer or electric hand mixer, beat the egg whites on medium-high speed until foamy. 
  • Add the cream of tartar and beat until soft peaks form (the peaks should be just starting to hold and will melt back into themselves after a second).
  • Gradually beat in 1/4 cup of the sugar and continue beating until stiff peaks form (the peaks will stand straight up when the beaters are lifted from the mixture). 
  • Using a large rubber spatula, fold the egg white mixture into the chocolate mixture until uniform. Set aside.
  • In another bowl, beat the heavy cream on medium-high speed until it begins to thicken up. 
  • Add the remaining 2 tablespoons of sugar and the vanilla and continue beating until the cream holds medium peaks (when you lift the beaters or whisk out of the bowl, the peaks will slightly droop down, but they won’t lose their shape entirely). 
  • Fold the whipped cream into the chocolate mixture. Be sure it is fully incorporated but don’t mix any more than necessary.
  • Divide the mousse between 6 individual glasses, cover, and chill until set, at least 4 hours.

Directions for Whipped Cream (make up to a few hours before serving)

  • Add the heavy cream and vanilla into cold bowl.
  • Beat for 2 minutes until thick.
  • Add the powdered sugar.
  • Beat until fluffy peaks form (about 5 minutes).
  • Top with chocolate shavings and serve.
  • Servings: 6
  • Prep Time: 30 Minutes
  • Total Time: 30 Minutes, plus at least 4 hours to chill
chocolate mousse
Chocolate Mousse

Tips, Tricks, and Don’ts That I Did

  • This recipe requires a ton of whipping. If you don’t have a stand mixer, a hand mixer will work just fine. Manual mixing the whipped cream is not recommended.
  • If you’re thinking of getting a Kitchen-aid Mixer, but haven’t pulled the trigger. Do it! This recipe will thank you. I bought mine a few years ago at Target and LOVE it more and more with every use. https://www.target.com/p/kitchenaid-professional-5qt-stand-mixer-kv25g0x/-/A-15840495?preselect=15764683#lnk=sametab
  • The chocolate will look a little odd when you first start mixing the eggs. Don’t panic! Once you fold in the cream it will look and taste amazing.
  • Don’t overmix your whipped cream. It only takes a few minutes to whip up the most light and airy whipped cream. Don’t set it and forget it!
  • The mousse can be eaten after setting for 4 hours, but it’s best to let it set overnight before enjoying.
  • If you liked this recipe, check out my recipe for a simple chocolate mousse pie. https://eats8.food.blog/new-year-new-mousse/
  • As always, don’t forget to enjoy!
Best Chocolate Cake Ever
cakes, Favorite Bakes

Best Chocolate Cake Ever

Best Chocolate Cake Ever

Last weekend my youngest had his very first sleepover. This meant I had some extra time (lets be real, A LOT of extra time) for me to go through my recipes and see what I haven’t blogged about. I realized that I have never posted the recipe for the cake (the best chocolate cake ever to be exact) that helped me fall in love with baking!

This chocolate cake recipe was sent to me by my biggest baking fan when I first expressed an interest in baking. I’ve been hooked on baking ever since. After a few tweaks and tries I was able to create the very best chocolate cake ever! Trust me, this is a cake your whole world will beg you to bake again and again. Below is the recipe for the best chocolate cake ever along with my tips, tricks, and don’ts that I did.

Chocolate Cake
Chocolate Cake

Cake Ingredients

  • ¾ cup of butter
  • 3 large eggs
  • ½ cup of Greek yogurt
  • 3 teaspoons of vanilla extract
  • 2 cups of all-purpose flour
  • 1 ½ cup of sugar
  • ½ cup of dark brown sugar
  • ¾ unsweetened cocoa powder
  • 1 ½ teaspoon of baking soda
  • 1 teaspoon of baking powder
  • 1 teaspoon of salt

Ganache Ingredients 

  • 2 cups of semi-sweet chocolate chips
  • 1 ½ cup of heavy cream

Cake Directions

  • Preheat oven to 350 degrees with the rack in the middle of the oven. Spray two 9-inch round cake pans with cooking spray.
  • In a small saucepan over medium heat combine butter and 1 cup of water. Heat until butter melts.
  • In a medium bowl whisk together eggs, yogurt, and vanilla.
  • In a large bowl (either stand mixer or hand mixer) whisk together flour, sugar, brown sugar, cocoa, baking soda, baking powder, and salt.
  • Add butter mixture. Mix on low until just combined.
  • Add yogurt mixture. Mix on medium until well combined, scraping down the sides of the bowl as needed.
  • Dividing evenly, pour cake batter into prepared cake pans.
  • Bake cakes for 30-35 minutes. 
  • Cool for 25-30 minutes.

Ganache Directions

  • Put chocolate chips into a medium bowl.
  • In a small saucepan over medium heat, heat cream until hot.
  • Pour heated cream over chocolate chips and let stand for one minute.
  • Gently whisk until smooth.
  • Divide ganache evenly into two bowls.
  • Let cool stirring occasionally until spreadable.

Building the Cake

  • Place one cake on a serving plate, bottom side up.
  • Spread the top with ganache in an even layer all the way to the edges of the cake.
  • Top with the other cake, bottom side down.
  • Gently reheat the remaining ganache in the microwave for 5-10 second until pourable.
  • Pour over the cake letting it drip down the sides.
  • Once the ganache has set, slice, serve and enjoy!
Chocolate Cake
Chocolate Cake and Merit Coffee

Tips, Tricks, and Don’ts that I did

  • This cake is very easy to over bake. If you need to bake for more than 35 minutes, make sure you watch it closely. If the edges start to darken it’s time to take it out. The cake will continue to bake while it’s cooling.
  • Don’t forget to let the cakes cool completely before putting it together with the ganache. 
  • You can put the ganache you’re using to spread on the first cake layer in the refrigerator if it’s taking too long to become spreadable.
  • Careful with the ganache. It’s dangerously good. If you’re like me, you’ll find yourself over the sink licking the spoon without even realizing what’s happening. 
  • This cake is a great dessert for a fun dinner party or can be devoured as a decadent breakfast (my personal favorite way to eat cake) with your favorite cup of coffee. Here’s a link one of the best coffee shops in Austin if you’re ever in the area https://meritcoffee.com
  • This cake is best enjoyed within a few days.
  • If you liked this recipe, check out my recipe for Mint Chiffon Cake. https://eats8.food.blog/mint-chiffon-cake/
  • As always, don’t forget to ENJOY!
Best Chocolate Cake Ever
S'more Cookies
Favorite Bakes

S’Mores Cookies

S'mores Cookies
S’mores Cookies

I love everything about Summer! From the heat to the beach, the magical Sunsets and late nights, the warm Sunrises and crisp Texas watering holes. Summer is my absolute favorite season. One of the things that comes to mind when I think about this toasty season is S’mores! My kids love this tasty summer treat, and we make them as often as we can during the summer months. For this week’s bake I’m baking cookies inspired by this classic summer snack. Below is the recipe for my easy S’mores Cookies along with my Tips, Tricks, And Don’ts that I did.

Ingredients

  1. 1 1/2 cups of all-purpose flour
  2. ½ teaspoon of baking powder
  3. ½ teaspoon of baking soda
  4. 1 teaspoon of corn starch
  5. 1 cup of semisweet chocolate chips
  6. 1/2 cup (8 tablespoons) of unsalted butter (room temperature)
  7. ¾ cup of light brown sugar
  8. 1 egg
  9. 1 tablespoon of vanilla extract
  10. ¼ teaspoon of salt
  11. 1 cup of mini marshmallows (chopped)
  12. 1 bar Hershey’s Chocolate (chopped)
  13. 4 Graham crackers (chopped)

Directions

  1. Roughly chop the Graham crackers, Hershey’s bar, and the mini marshmallows.
  2. Combine the flour, salt, baking powder, baking soda, and corn starch in a bowl then whisk together and set aside.
  3. Using a stand or hand mixer, beat butter and sugars in a bowl until creamy, about 2 minutes. Add in egg and vanilla until combined.
  4. Gradually add flour mixture to butter mixture, beating on low speed until just combined.
  5. Fold the chocolate chips, chopped marshmallows, Hershey’s bar, and graham crackers into the dough, making sure to mix thoroughly.
  6. Refrigerate dough for at least an hour.
  7. Heat oven to 350F. Portion out about two tablespoons sized pieces of dough. Roll into balls and place on a parchment-lined baking sheet, about 2 inches apart.
  8. Bake at 350° for 12 minutes or until cookies are toasty brown.
  9. Cool and Enjoy!
S'mores Cookies
Easy S’mores Cookies

Tips, Tricks, and Don’ts That I Did

  1. Make sure to chop or tear your marshmallows into tiny bits. Marshmallows puff up and spread when heated. If they are too big, they will create a giant sticky mess of a cookie.
  2. Don’t skimp on refrigerating the dough. Cold dough makes soft cookies.
  3. I had a few different kinds of chocolate chips in my pantry and used a little bit of each. Feel free to choose your own chocolate for this cookie. I bet dark chocolate S’mores Cookies would be heavenly!
  4. For a little toastier flavor, top warm cookies with marshmallow bits and heat with a blowtorch.
  5. These cookies are best enjoyed warm. You can reheat them in the microwave for 5 seconds to get the marshmallows back to their former gooey glory.
  6. If you liked this recipe, be sure to check out my recipe for Oreo Fudge Brownie Cookies here https://eats8.food.blog/oreo-fudge-brownie-cookies/
  7. If you’re feeling inspired and looking for S’More inspiration, check out Hershey’s ideas S’more’s page here for a few delicious ideas for this classic treat. https://www.hersheyland.com/smores
  8. As always, don’t forget to Enjoy!
S'mores Cookies
New Summer Favorite!
mae bakes
Lifestyle

Let’s Get Personal! 5 Fun Facts About Me

5 Fun Facts
Bonus fun facts… I love baby goats, but I’m too sensitive to smells to ever own one 🙂

This week has been wild at work and unfortunately, I haven’t had much time to bake. I was looking through my blogs and realized I’ve done over 30 posts in the last 2 years. I decided now would be the perfect time to reintroduce myself to the blogging and social world with a few fun facts about this new baker turned blogger. Check out these 5 fun facts about me you probably don’t know and leave one about yourself in the comments. Let’s have some fun!

  1. My full-time job is in construction. Yep, that’s right. This girly girl spends most of her days with men on construction sites and I wouldn’t have it any other way. I absolutely LOVE my job and the people I work with. 
  2. I workout 6 days a week and by workout I mean lifting heavy and high intensity cardio. I wouldn’t call myself a gym rat more of a gym Lion. Going to the gym and being active is like breathing for me; I can’t live without it.
  3. I own a Jeep and never thought I’d love a vehicle as much as I love her. I honestly feel like she was made for me. I joke that my Jeep is my soulmate. Any fellow Jeepers out there?
  4. I love to travel and have been lucky enough to visit a few of my bucket list places. My travel list is long, and I have so many more cities I can’t wait to explore. So far Ireland has been my favorite place. I’m looking forward to going back as soon as I can.
  5. I was born and raised in a very small town in south Alabama, but I’ve lived in a few cities since then. I moved to Austin 5 years ago and finally felt like I was home. If my jeep is my soulmate then Austin is my love story. As the saying goes “I wasn’t born in Texas, but I got here as fast as I could” If you haven’t been to Austin, come visit. We’d love to have you!

Don’t forget to share a fun fact about yourself in the comments! I’d love to get to know you too! 

If you want to know even more about me check out my About Me page here https://eats8.food.blog/about/

If you’re curious about my Jeep adventures check out my Jeep Instagram here https://www.instagram.com/seaseajeep/

Easy No-Bake Cheesecake
Easy Bakes, Kids Bakes

Easy No-Bake Cheesecake with Rice Krispies Treats Crumbles

Easy No-Bake Cheesecake

One of my all-time favorite summer treats is cheesecake! Especially a cool, creamy and easy no-bake cheesecake with Rice Krispies Treats Crumbles! I first made this recipe as a full cheesecake with a Rice Krispies crust but decided to make it kid friendly by filling mason jars with the cheesecake and using the Rice Krispies Treats crumbles for some added crunch. Below is my recipe for an easy no-bake cheesecake your family and friends will love!

Cheesecake Ingredients 

  1. 2 cups of cold heavy whipping cream
  2. 3 (8- ounce) packages cream cheese, room temperature
  3. 1 cup of powdered sugar
  4. 1 tablespoon of vanilla extract

Rice Krispies Treats Crumbles Ingredients 

  1. 3 cups of Rice Krispies cereal
  2. 2 cups of mini marshmallows
  3. 2 tablespoons of butter

Directions for Rice Krispies Treats Crumbles

  1. In large saucepan melt butter over low heat. 
  2. Add marshmallows and stir until completely melted. 
  3. Remove from heat.
  4. Add KELLOGG’S RICE KRISPIES cereal. Stir until well coated.
  5. Line a baking sheet with parchment paper and pour Rice Krispies mixture onto baking sheet.
  6. Add another sheet of parchment paper on top and roll with a roll pin until your Rice Krispies are flat.
  7. Pull or cut small pieces of the Rice Krispies and roll into small balls. (You can also use cookie cutters to shape them into fun shapes for the toppings)
  8. Put to the side

Directions for the Cheesecake

  1. In the bowl of your stand mixer fitted with the whisk attachment, beat the heavy cream on medium-high speed until stiff peaks form. Remove the whipped cream from the mixing bowl and set aside.
  2. In the same mixing bowl, replace the whisk attachment with the paddle attachment. Mix the cream cheese, powdered sugar, and vanilla extract together on medium speed for 2 minutes, or until smooth and creamy, scraping the sides of the bowl as needed.
  3. Remove the bowl from the mixer and using a rubber spatula, fold in the whipped cream evenly, making sure to scrape the sides and bottom of the bowl completely.
  4. Add cheesecake to 8 small 8 oz mason jars
  5. Cover and chill for 4 hours or overnight.
  6. Remove from refrigerator and top with Rice Krispies Treats crumbles
No-Bake Cheesecake
Easy No-Bake Cheesecake with Rice Krispies Treats Crumbles

Tips, Tricks, and Don’ts That I did

  1. Put your bowl and whisk attachment into the freezer for 30+ minutes before making your whipped cream. This little trick helps make the creamiest whipped cream you’ll ever eat.
  2. Another tip to ensure the creamiest whipped cream, make sure your heavy cream is very cold.
  3. Take the cream cheese out of the refrigerator a few hours before you’re ready to start your cheesecake. It needs to be room temperature for this cheesecake to work.
  4. Don’t forget to be very gentle when folding the whipped cream into the whipped cream cheese. This will ensure the cheesecake keeps its light fluffy texture.
  5. You can make recipe as a full cheesecake instead of the smaller portions. Just double the recipe for the Rice Krispies and use a 9-inch round pan for the crust. Pack the bottom of the pan with the Rice Krispies and top with the cheesecake mixture, cover and chill overnight.
  6. If you’re unsure where to buy mason jars; Target has a ton of options! I picked these super cute ones up last week. https://www.target.com/p/ball-8oz-4pk-aqua-vintage-regular-mouth-jars/-/A-54314698#lnk=sametab
  7. If you like this recipe, check out these easy brown sugar chocolate chip cookies that are sure to WOW your friends and family just in time for 4th of July! https://eats8.food.blog/easy-brown-sugar-chocolate-chip-cookies/
  8. As always, don’t forget to Enjoy!
Easy No-Bake Cheesecake
No-Bake Cheesecake
Easy Peach Turnovers
Favorite Bakes

Easy Peach Turnovers

Easy Peach Turnovers

Summer has arrived in Texas which means PEACHES! This weekend one of my little helpers and I headed to the Texas Farmers Market in Austin to pick up some delicious peaches. Besides eating several of the juicy fruit over the sink I wanted to make a few different bakes with the peaches. The first bake on my list was easy peach turnovers. This one is so easy to bake, you’ll want to bake it on a relaxing Sunday morning to share with your favorite people. They’ll be so glad you did. Below is the recipe along with my Tips, Tricks, and Don’ts that I did. Enjoy!

Ingredients For the Puff Pastry

  1. 2 cups all purpose flour
  2. 1 teaspoon salt
  3. 1 1/4 cups unsalted butter (2 1/2 sticks), cold
  4. 1/2 cup cold water

Instructions For the Puff Pasty

  1. Place the flour and salt in a large bowl and whisk to combine.
  2. Cut the cold butter into 1/4-inch slices and add to the flour mixture, tossing to coat.
  3. Stir in the cold water until a thick dough forms.
  4. Gather the dough into a ball, flatten it into a disk-shape, and wrap in plastic wrap.
  5. Chill for 1 hour in the fridge, or 20 to 30 minutes in the freezer.
  6. Unwrap the dough, dust the work surface with flour, and roll the dough into a rough rectangle shape.
  7. Fold the dough in thirds, like a letter.
  8. Turn 90 degrees, roll and fold again.
  9. Repeat about 2 to 4 times, wrap the dough in plastic wrap, and chill for 2 hours or overnight.

Ingredients For the Filling

  1. 2 cups small diced peaches
  2. 1 Tablespoon brown sugar
  3. 1/2 teaspoon cinnamon
  4. 1 teaspoon vanilla
  5. 1 Tablespoon lemon juice
  6. Flour, for dusting work surface
  7. 1 large egg, whisked
  8. Granulated Sugar

Instructions for Turnovers

  1. Preheat the oven to 400°F. Line two baking sheets with parchment paper.
  2. In a large bowl, stir together the peaches, brown sugar, cinnamon, vanilla, and lemon juice.
  3. Unfold the puff pastry onto a lightly floured work surface. Using a rolling pin, gently roll over the pastry to seal any perforations then cut into 8 squares.
  4. Using a slotted spoon, scoop a portion of the peach mixture into the center of each puff pastry square then fold the pastry across diagonally to form triangles. Using a fork, crimp together the edges then transfer the turnovers to the prepared baking sheets, spacing them at least 2 inches apart.
  5. Cut three small slits in the tops of each turnover then brush them with the egg. Sprinkle the turnovers with sugar.
  6. Bake the turnovers for 20 minutes or until they’re golden brown and puffed. Transfer the turnovers to a rack to cool then serve warm or at room temperature.
Fresh Out of the Oven Turnovers

Tips, Tricks, and Don’ts That I did

  1. Peaches are my go-to fruit in the summer, but this recipe can be used with strawberries, cherries, or any other fruit you can get in your area.
  2. If you live in the Austin, TX area, I highly recommend the Texas Farmers Market. They operate year-round at two different locations around the city and always have the best vendors with the freshest produce. Check them out here https://texasfarmersmarket.org
  3. If you have the time, make the puff pastry the night before. It’s very easy but does need time to chill. With your pre-made puff pastry the turnovers take just a few minutes to put together and 20 minutes in the oven. It’s one of the easiest and most delicious breakfast pastries you’ll over make.
  4. Make sure not to handle your dough too much when you’re making the puff pastry. A flaky crust requires very cold butter. If your butter starts to melt, pop the dough in the fridge for a few minutes before you continue handling it.
  5. You can use a fork to cut in the cold butter, but a dough blender is much easier. I picked up this one at Target https://www.target.com/p/kitchenaid-pastry-blender-black/-/A-76341870#lnk=sametab
  6. Crimping the pastries is necessary so your filling doesn’t fall out. If your fork starts to stick, dip it in a bit of flour to keep it from sticking.
  7. Turnovers are best served warm and can be reheated in the microwave for about 10 seconds.
  8. If you like this recipe, check out my peach galette recipe here https://eats8.food.blog/easy-peach-galette/
  9. As always, don’t forget to Enjoy!
Peach Turnovers
Peach Turnovers
Black Pumas
Lifestyle

An Intimate Concert with 2000 Strangers

An Intimate Concert with 2000 Strangers

I honestly never thought I’d go to another concert, especially not one a little over a year after the pandemic started. I absolutely didn’t expect my first show after Covid to be an intimate concert with 2000 strangers. The last concert I went to right before quarantine was Incubus. We saw them at ACL Moody Theater, and it was the perfect show; one of the best shows I have ever been to. The Incubus concert was so amazing it made it easier to accept that it would be a long time before I ever saw a live show due to Covid-19.

We purchased tickets to Black Pumas right after they played the Presidential Inauguration. At that time there wasn’t a vaccine, and I imagined this show much differently than it turned out to be. I thought it would be fun, but not the way concerts were before the pandemic. I knew I’d be worried anytime someone bumped into me. I was concerned the heat of the masks and the amount of people would cause unbearable anxiety, but I LOVE Black Pumas and I was willing to endure whatever my anxiety riddled brain had to throw at me to see them live.

Obviously and thankfully none of that anxiety happened. We’re both fully vaccinated and got to see Black Pumas play an amazing show with a couple thousand of our fellow Austinites. We danced, we laughed, we sang, and we had the BEST time. Sweat from strangers was all over us, beers were spilled down our backs, toes were crushed from everyone dancing, but none of that mattered. We were at a show, listening to one of our favorite bands, having the time of our lives. It felt so good to be back to almost normal, to be with people, to dance while listening to a great band in the middle of one of the greatest cities on earth.

Below are some Tips, Tricks, and Don’ts that I Did if you’re planning a post-Pandemic outing.

Black Pumas
Black Pumas

Tips, Tricks, and Don’ts That I Did

  1. Location! Location! Location! We saw Black Puma’s at Stubbs BBQ in downtown Austin. It was the first time either of us had been there and oh my goodness!! Such a great venue!! If you ever get a chance to see a concert at Stubbs, do it. You won’t regret it. Even with the Texas heat it was one of the best places I’ve ever seen a live show. Check out upcoming shows at Stubbs here  https://www.stubbsaustin.com
  2. Wear closed toe shoes. I don’t know if it was the isolation or pandemic brain fog but we both wore sandals… to a concert. We know better, but the sandals still ended up on our feet. My toes were sore even a few days later.
  3. Don’t stress about where to eat. We planned to eat at a food truck that ended up being closed. We wandered around for a while trying to find something else but found ourselves back at Stubbs. The food was great, and we were right where we needed to be for the show. 
  4. Being around a lot of people is kind of stressful in the beginning. Just remind yourself that most people are feeling the same way. Don’t let it ruin your night. Everyone is trying to get back to normal just like you are.
  5. Austin local Tameca Jones opened for The Black Pumas, and she was amazing!! If you get the opportunity to see her live… GO! You’ll love her as much as we do. You can check out her music here  http://tamecajones.com
Tameka Jones
Tameca Jones
Kids Bakes

Easy Oreo Dirt Cake with Gummy Worms

Dirt Cake

Summer! Finally! I know I’m not the only one who feels like this school year has lasted a bazillion years… I had one kid at school in person (the youngest) and one kid who did the entire year virtually (the oldest, 12 going on 50). I asked my 12-year-old how he felt on the last day of school and he said “tired” (I’m with ya kid!) It’s been a long year for everyone, so I decided to throw a quick party for the neighborhood kids to celebrate the end of the school year and kick off the summer.

I headed to Target to grab some party supplies and found some super cute treat cups. Next, I spotted gluten-free Oreos and knew what I had to make. DIRT CAKE! My kids LOVE my homemade whipped cream, so dirt cake was the PERFECT treat to whip together. Below you’ll find my recipe for a summer party favorite along with my Tips, Tricks, and Don’ts that I did! Enjoy!

Ingredients

  1. 2 boxes of chocolate pudding
  2. 1 package of (family size) Oreos
  3. 1 bag of Gummy Worms
  4. Homemade Whipped Cream
  5. 12 individual Treat Cups, Bowls or Tupperware

Ingredients for Whipped Cream

  1. 2 cups of heavy cream
  2. 2 teaspoons of powdered sugar
  3. 2 tablespoons of vanilla

Directions for Pudding and Oreos

  1. Make the pudding according to the directions on the box. Let it chill for at least 1 hour.
  2. Smash the heck out of the Oreos. Add several Oreos to a freezer bag and pound with a hammer or meat tenderizer until crumbled.

Directions for Whipped Cream

  1. Add the heavy cream and vanilla into cold bowl.
  2. Beat for 2 minutes until thick.
  3. Add the powdered sugar.
  4. Beat until fluffy peaks form (about 5 minutes).

Putting It All Together

  1. Cover the bottom of the treat cup with the crushed Oreos (about 2 crushed cookies).
  2. Add 1/4 cup of pudding.
  3. Dollop 2 tablespoons of whipped cream.
  4. Sprinkle with more Oreos.
  5. Add 4 gummy worms (more or less depending on how much you like gummy worms).
  6. Repeat steps 1-5 for the remaining 11 cups.

Tips, Tricks, and Don’ts That I Did

  1. Freeze the bowl and beaters you’re using to make the whipped cream for at least an hour. It’s a little thing that makes a BIG difference. You’ll end up with a much fluffier cream using the cold bowl and beaters.
  2. Double up your freezer bags when crushing the Oreos. My freezer bag tore and I ended up with cookies all over the place. Doubling the bags will help catch wild Oreos if the first bag tears.
  3. Let the kids help! This is a fun activity everyone will have enjoy making!
  4. Refrigerate the finished treats for at least 30 minutes before eating.
  5. As always, don’t forget to ENJOY!