Chocolate Mousse
Easy Bakes

Chocolate Mousse

Easy Chocolate Mousse

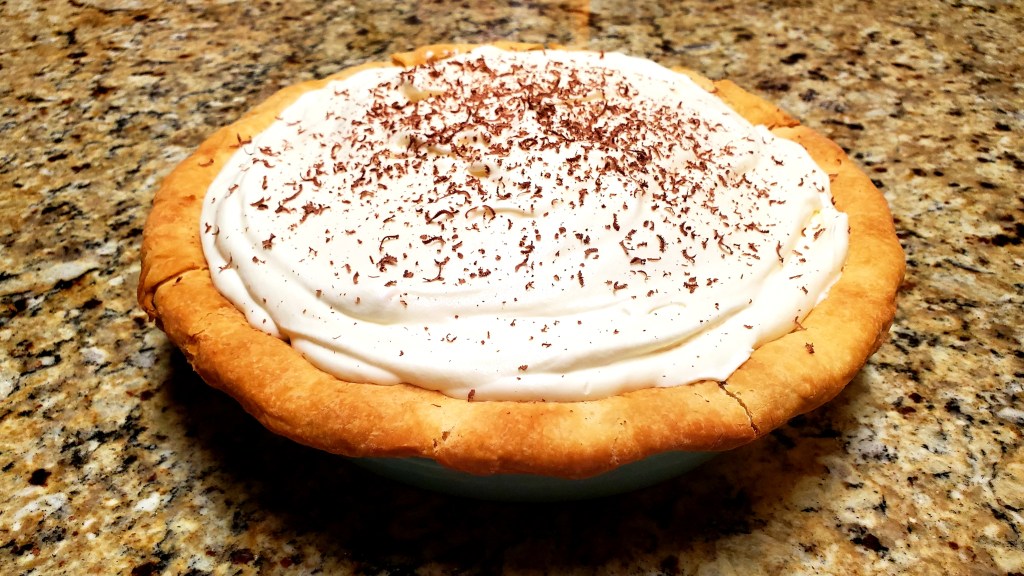
I love chocolate. I love chocolate mousse. And of course I love trying new recipes. For this week’s bake I wanted to try something decadent that was also new to me. I’ve never made a real French mousse before and during my baking research decided I needed to try it out. This recipe is creamy and airy. Heavy on the chocolate flavor but light on texture. It’s a refined yet fun dessert that both kids and adults can enjoy. Below is my take on a French mousse that’s easy to make, yet hard to forget. Profiter!

Ingredients for Mousse

  • 3 tablespoons of unsalted butter 
  • 6 ounces of semisweet chocolate, best quality 
  • 3 large eggs, yolks and whites separated 
  • 1/2 teaspoon of cream of tartar 
  • 1/4 cup plus 2 tablespoons of sugar 
  • 1/2 cup of heavy cream, cold
  • 1 teaspoon of vanilla extract

Ingredients for Whipped Cream (for serving)

  • 1/2 cup of heavy cream, cold
  • 1 tablespoon of vanilla extract
  • 2 teaspoons of sugar
  • Chocolate shavings

Directions for Mousse

  • Place the butter in a medium microwave-safe bowl. 
  • Break the chocolate into small pieces directly into the bowl. Microwave it in 20-second intervals, stirring between each bout of heat, until the chocolate is about 75% melted. 
  • Stir, allowing the residual heat in the bowl to melt the chocolate completely. 
  • Let the mixture cool for a few minutes, then whisk in the egg yolks one at a time, mixing until smooth after each addition. Set aside.
  • In the bowl of a stand mixer or electric hand mixer, beat the egg whites on medium-high speed until foamy. 
  • Add the cream of tartar and beat until soft peaks form (the peaks should be just starting to hold and will melt back into themselves after a second).
  • Gradually beat in 1/4 cup of the sugar and continue beating until stiff peaks form (the peaks will stand straight up when the beaters are lifted from the mixture). 
  • Using a large rubber spatula, fold the egg white mixture into the chocolate mixture until uniform. Set aside.
  • In another bowl, beat the heavy cream on medium-high speed until it begins to thicken up. 
  • Add the remaining 2 tablespoons of sugar and the vanilla and continue beating until the cream holds medium peaks (when you lift the beaters or whisk out of the bowl, the peaks will slightly droop down, but they won’t lose their shape entirely). 
  • Fold the whipped cream into the chocolate mixture. Be sure it is fully incorporated but don’t mix any more than necessary.
  • Divide the mousse between 6 individual glasses, cover, and chill until set, at least 4 hours.

Directions for Whipped Cream (make up to a few hours before serving)

  • Add the heavy cream and vanilla into cold bowl.
  • Beat for 2 minutes until thick.
  • Add the powdered sugar.
  • Beat until fluffy peaks form (about 5 minutes).
  • Top with chocolate shavings and serve.
  • Servings: 6
  • Prep Time: 30 Minutes
  • Total Time: 30 Minutes, plus at least 4 hours to chill
chocolate mousse
Chocolate Mousse

Tips, Tricks, and Don’ts That I Did

  • This recipe requires a ton of whipping. If you don’t have a stand mixer, a hand mixer will work just fine. Manual mixing the whipped cream is not recommended.
  • If you’re thinking of getting a Kitchen-aid Mixer, but haven’t pulled the trigger. Do it! This recipe will thank you. I bought mine a few years ago at Target and LOVE it more and more with every use. https://www.target.com/p/kitchenaid-professional-5qt-stand-mixer-kv25g0x/-/A-15840495?preselect=15764683#lnk=sametab
  • The chocolate will look a little odd when you first start mixing the eggs. Don’t panic! Once you fold in the cream it will look and taste amazing.
  • Don’t overmix your whipped cream. It only takes a few minutes to whip up the most light and airy whipped cream. Don’t set it and forget it!
  • The mousse can be eaten after setting for 4 hours, but it’s best to let it set overnight before enjoying.
  • If you liked this recipe, check out my recipe for a simple chocolate mousse pie. https://eats8.food.blog/new-year-new-mousse/
  • As always, don’t forget to enjoy!
Best Chocolate Cake Ever
cakes, Favorite Bakes

Best Chocolate Cake Ever

Best Chocolate Cake Ever

Last weekend my youngest had his very first sleepover. This meant I had some extra time (lets be real, A LOT of extra time) for me to go through my recipes and see what I haven’t blogged about. I realized that I have never posted the recipe for the cake (the best chocolate cake ever to be exact) that helped me fall in love with baking!

This chocolate cake recipe was sent to me by my biggest baking fan when I first expressed an interest in baking. I’ve been hooked on baking ever since. After a few tweaks and tries I was able to create the very best chocolate cake ever! Trust me, this is a cake your whole world will beg you to bake again and again. Below is the recipe for the best chocolate cake ever along with my tips, tricks, and don’ts that I did.

Chocolate Cake
Chocolate Cake

Cake Ingredients

  • ¾ cup of butter
  • 3 large eggs
  • ½ cup of Greek yogurt
  • 3 teaspoons of vanilla extract
  • 2 cups of all-purpose flour
  • 1 ½ cup of sugar
  • ½ cup of dark brown sugar
  • ¾ unsweetened cocoa powder
  • 1 ½ teaspoon of baking soda
  • 1 teaspoon of baking powder
  • 1 teaspoon of salt

Ganache Ingredients 

  • 2 cups of semi-sweet chocolate chips
  • 1 ½ cup of heavy cream

Cake Directions

  • Preheat oven to 350 degrees with the rack in the middle of the oven. Spray two 9-inch round cake pans with cooking spray.
  • In a small saucepan over medium heat combine butter and 1 cup of water. Heat until butter melts.
  • In a medium bowl whisk together eggs, yogurt, and vanilla.
  • In a large bowl (either stand mixer or hand mixer) whisk together flour, sugar, brown sugar, cocoa, baking soda, baking powder, and salt.
  • Add butter mixture. Mix on low until just combined.
  • Add yogurt mixture. Mix on medium until well combined, scraping down the sides of the bowl as needed.
  • Dividing evenly, pour cake batter into prepared cake pans.
  • Bake cakes for 30-35 minutes. 
  • Cool for 25-30 minutes.

Ganache Directions

  • Put chocolate chips into a medium bowl.
  • In a small saucepan over medium heat, heat cream until hot.
  • Pour heated cream over chocolate chips and let stand for one minute.
  • Gently whisk until smooth.
  • Divide ganache evenly into two bowls.
  • Let cool stirring occasionally until spreadable.

Building the Cake

  • Place one cake on a serving plate, bottom side up.
  • Spread the top with ganache in an even layer all the way to the edges of the cake.
  • Top with the other cake, bottom side down.
  • Gently reheat the remaining ganache in the microwave for 5-10 second until pourable.
  • Pour over the cake letting it drip down the sides.
  • Once the ganache has set, slice, serve and enjoy!
Chocolate Cake
Chocolate Cake and Merit Coffee

Tips, Tricks, and Don’ts that I did

  • This cake is very easy to over bake. If you need to bake for more than 35 minutes, make sure you watch it closely. If the edges start to darken it’s time to take it out. The cake will continue to bake while it’s cooling.
  • Don’t forget to let the cakes cool completely before putting it together with the ganache. 
  • You can put the ganache you’re using to spread on the first cake layer in the refrigerator if it’s taking too long to become spreadable.
  • Careful with the ganache. It’s dangerously good. If you’re like me, you’ll find yourself over the sink licking the spoon without even realizing what’s happening. 
  • This cake is a great dessert for a fun dinner party or can be devoured as a decadent breakfast (my personal favorite way to eat cake) with your favorite cup of coffee. Here’s a link one of the best coffee shops in Austin if you’re ever in the area https://meritcoffee.com
  • This cake is best enjoyed within a few days.
  • If you liked this recipe, check out my recipe for Mint Chiffon Cake. https://eats8.food.blog/mint-chiffon-cake/
  • As always, don’t forget to ENJOY!
Best Chocolate Cake Ever
Favorite Bakes

Chocolate Baklava

Easy Chocolate Baklava

This week’s bake is inspired by my cousin Erin. We recently met through one of those DNA tests, 23 and me. Her mom and my mom grew up together and lost contact years ago, but through the magic of technology and science, she and I connected.We immediately hit it off and have quickly become great friends. Because I was so inspired by my new cousin who feels like an old friend, this week we’re adding a new take on an old favorite, Chocolate Baklava!

Baklava is one of my favorite bakes to make and since I was making this batch for Erin (who just had twin boys!) I knew I wanted it to be an amazing treat this new momma would love. This recipe is just as easy as my original Baklava recipe with a little added Nutella that gives it a new delicious flavor. Below is the recipe along with my tips and tricks and don’ts that I did. (side note, my baklava connoisseur loved this one too) Enjoy!

Ingredients for Honey Sauce

1 cup of water

1 cup of sugar

1 and 1/2 cups of honey

2 tablespoons of vanilla extract

1 tablespoon of cinnamon

Directions for Honey Sauce

Add water and sugar to medium-sized pot and bring to a boil.

Stir until sugar has completely dissolved.

Turn heat down to medium and add honey slowly while stirring.

Add vanilla extract and cinnamon

Continue to simmer for 20 minutes stirring occasionally.

Remove from heat and let cool.

Ingredients for Nut Mixture

6 ounces of finely chopped walnuts

6 ounces of finely chopped pistachios

6 ounces of finely chopped pecans

6 ounces of finely chopped hazelnuts

1 teaspoon ground cinnamon

1 teaspoon sugar

Directions for Baklava

1 package (16 ounces) of filo dough

1/2 cup of Nutella (melted in the microwave for 25-30 seconds)

Preheat oven to 350 degrees.

Add chopped nuts, cinnamon, and sugar to a bowl, mix, and set aside.

Melt butter in microwave.

Using a pastry brush, brush the butter on to a 9×13 in baking dish.

Add one sheet of filo and brush dough with a thin layer of butter. Repeat this step until you have layered 10 sheets of filo.

Brush Nutella on top of filo after the butter.

Add 3/4 cup of the nut mixture to the pan of filo.

Add five sheets of filo to the pan buttering in between each layer of dough.

Repeat the two steps above 3 more times.

Add 10 sheets of filo, buttering in between each layer and butter the top.

Here’s a breakdown of the order for the Baklava

  • 10 buttered sheets of filo, Nutella, 3/4 cup nut mixture
  • 5 buttered sheets of filo, Nutella, 3/4 cup nut mixture
  • 5 buttered sheets of filo, Nutella, 3/4 cup nut mixture
  • 5 buttered sheets of filo, Nutella 3/4 cup nut mixture
  • 5 buttered sheets of filo, Nutella 3/4 cup nut mixture
  • 10 buttered sheets of filo, butter top of pastry

Using a sharp knife, cut the pastry into squares and then the squares into triangles.

Bake baklava for 50 minutes or until golden brown and crisp on top.

Remove from the oven and immediately pour the sauce over the entire pan.

Sprinkle remaining nut mixture over the top of the baklava.

Let sit and cool for a few hours before serving.

Chocolate Baklava

Tips and Tricks and a few Don’ts that I did

Make your honey sauce before you start building your baklava, giving it enough time to cool before adding it to the bake.

Don’t worry if your sauce is a little runny. It will thicken as it cools.

Filo dough is very very fragile. I recommend covering the dough with damp paper towels in between uses. Don’t worry if some of the filo tears during layering. You won’t be able to see it when the bake is complete.

Keep your butter hot. I melted mine in a microwavable safe bowl, boiled some water, and set the bowl in the hot water while I put together my baklava.

Be careful not to overheat your Nutella. You only need to heat enough to make it spreadable so can be brushed on the filo without tearing it. About 25-30 seconds is plenty.

When cutting the pastry, try not to cut the bottom few layers. This will help hold the sauce and allow it to soak more into the pastry.

Make sure you listen for the crackle when pouring the sauce over the Baklava. The crackle lets you know you’ve made a perfect baklava!

This bake is best after it sits for at least 3 hours and even better the next day. This gives the pastry enough time to absorb the sauce. The longer it sits, the better it tastes!

Baklava can be stored in the refrigerator or freezer and enjoyed later, but it’s best served at room temperature within a few days.

Delicious Chocolate Baklava
Favorite Bakes, pies

Simple Mousse Recipe

For Christmas this year I gifted myself a new mixer and thought making a mousse would be a perfect way to test it out. So for my first bake and blog of the New Year I made one of my favorites, a Chocolate Mousse Pie.

This was the first time I did a blind bake with my crust too so I wanted to make sure I got the crust perfectly flaky and absolutely did not want a soggy bottom. This meant I needed to do my research and lots of it. I spent a few hours online reading various recipes and reviews about the perfect way to blind bake a pie crust. There is a ton of information out there about the best options, from pie weights to uncooked rice and beans and more in between. Ultimately I decided to go with sugar because I had sugar on hand and it had great reviews from fellow bakers.

Below is the recipe for the chocolate mousse, the crust, the blind bake and how to put it all together for a delicious light and fluffy New Year Treat. I’ve also included my tips and tricks and don’ts that I did at the end.

Ingredients for Single Pie Crust

1 cup all purpose flour

1/4 teaspoon salt

1/3 cup butter

1 and 1/2 tablespoons white vinegar

4 tablespoons 2% milk

Directions for Pie Crust

In a small bowl combine the flour and salt.

Cut in butter with fork until the mixture is crumbly.

Sprinkle mixture with vinegar.

Gradually add milk tossing with a fork until a ball is formed.

Cover with foil and refrigerate for 30 minutes until easy to handle.

Blind Baking Your Crust

Once the dough is chilled, roll out pastry on a lightly floured surface to fit 9 inch pie plate.

Crimp edges a little taller than the pie plate so there is less room to shrink.

Line crust with heavy duty aluminum foil.

Freeze crust for at least an hour.

Once the crust has had time to freeze, preheat oven to 350 degrees.

Fill pie to the top with granulated sugar.

Bake for 60-75 minutes.

Remove pie crust from oven.

Remove sugar and store sugar for later use.

Let crust cool and prepare mousse.

Ingredients for Mousse

4 cups heavy cream

6 tablespoons of sugar

12 ounces semi sweet chocolate chips

1 teaspoon vanilla extract

Directions for Mousse

With stand mixer beat 3 cups of heavy cream and sugar to stiff peaks (about 6-8 minutes) refrigerate until ready to use.

In a medium saucepan combine 1 cup of heavy cream, chocolate chips and vanilla.

Place over medium heat, stirring constantly to avoid burning the chocolate.

Once the chocolate has melted (about 2-3 minutes) remove from heat and let cool.

When chocolate has cooled, gently fold it into 2 thirds of the whipped cream until completely incorporated

Putting It All Together

Pour mousse into prepared crust.

Refrigerate for 8 hours or freeze for 4

Top with remaining whipped cream and serve.

Tips and Tricks and a Few Don’ts That I did

Don’t be afraid to get your hands dirty when making the crust. I found that in order to cut in the butter to the flour my hands worked better than the fork.

That being said be careful not to handle the dough too much. Overworking the dough will cause it to become tough and not tender and flaky. The key to a good pie crust is cold butter.

One mousse recipe I tried said to add salt to the semi sweet chocolate. Whatever you do, DO NOT add salt to semi sweet chocolate. That type of chocolate has a saltiness to it already and adding more salt made it inedible. It was AWFUL. I ended up throwing out the entire thing and starting over minus the salt. It turned much much better.

I’ve given this tip before, but it’s worth repeating. Do not stop stirring your chocolate. It melts and burns really fast. I use a rubber spatula to stir and scrape the bottom of the pan. It works great and so far I haven’t burned a batch of chocolate. **knock on wood**

A stand mixer is awesome to achieve quick peaks, but it isn’t necessary. I’ve made whipped cream with a hand mixer and it turned out just as great.

Freeze or refrigerate your pie, but make sure it’s served cold. I froze mine to share later this week. If you freeze it just be sure to take it out of the freezer at least 30 minutes prior to serving so the crust has time to thaw a little.

Enjoy and Have a Very Happy New Year!!!